How to Fix Indentation in Google Docs

Is your text all over the page in Google Docs? You might need to look at fixing indentation in your document. This guide explains how.
A badly formatted document is enough to ruin it. For example, if your text is indented poorly, it’ll be tricky to read what you’re trying to say.
Good formatting, on the other hand, can really make a document pop. One way to improve how your document looks is to use consistent indentation. This will make your text easier to read and give it a professional look.
If you want to fix indentation in Google Docs, follow the steps below.
How to Fix Indentation Using Your Keyboard
The quickest way to fix text indentation in Google Docs is to use a keyboard shortcut. This’ll allow you to quickly change the indentation for the text that you’ve selected. It will also change the indentation for the line that your blinking cursor is currently on (as long as it is at the start of the line).
Once the text is selected (or once you’ve moved your blinking cursor to the right position), use the Tab key to move the text further to the right—indenting it in the process. Alternatively, use the Shift + Tab keys to move the text back to the left.
You can repeat this for any other parts of your text.
How to Fix Indentation Using the Toolbar
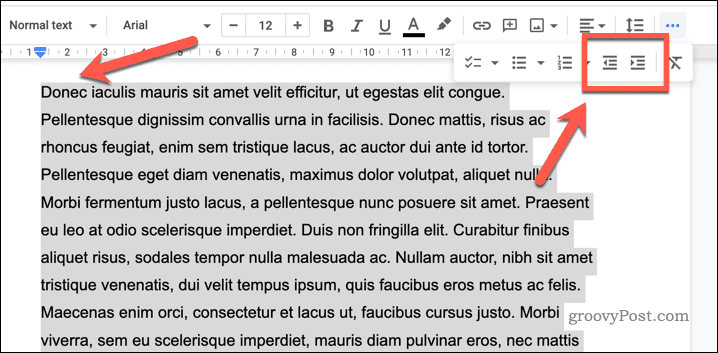
Google Docs has several formatting tools on the toolbar that you can use to change your document, including tools to change text indentation. These tools will allow you to move the text left or right, depending on your preference.
To use the toolbar to change text indentation in Google Docs:
- Open your Google Docs document.
- Select the text that you want to adjust the indentation for. Alternatively, place your blinking cursor at the start of the line.
- Locate the Increase Indent and Decrease Indent icons on the toolbar. These buttons are usually located on the right side of the toolbar. They’ll appear as a right-facing arrow (to increase the indentation) and a left-facing arrow (to decrease the indentation).
- To indent the selected text, press the Increase Indent button once for each increment of text indentation you want to apply.
- To remove indentation, click the Decrease Indent button once for each level of indentation you want to remove.

As required, you can repeat these steps in other areas of your document.
How to Fix Indentation Using the Guide Rulers
The guide rulers in Google Docs are a visual tool that allows you to align and measure elements within your document. The horizontal ruler is at the top of the document, and the vertical ruler is on the left side.
You can use the guide rulers to change text indentation in Google Docs.
To use the Guide Rulers in Google Docs to fix text indentation:
- Open your Google Docs document and select the text that you want to indent.
- Go to View > Show Ruler. This will display the horizontal and vertical rulers at the top and side of your document (if it isn’t visible already).

- Next, drag the blue tab at the top of the horizontal ruler to the desired indentation point—this should be in the same position (horizontally) as the start of your text. This will indent the first line of your paragraph.

- If you want to indent every line, move the blue arrow to your preferred indentation point instead.


Moving the blue tab will move the text to a new indentation point. This may disrupt other formatting in your document, so repeat these steps to resolve any issues.
Changing Indentation Settings in Google Docs
Using the Indentation Settings menu, you can change the default indentation settings in your Google Docs document.
To change text indentation settings in Google Docs:
- Open your Google Docs document.
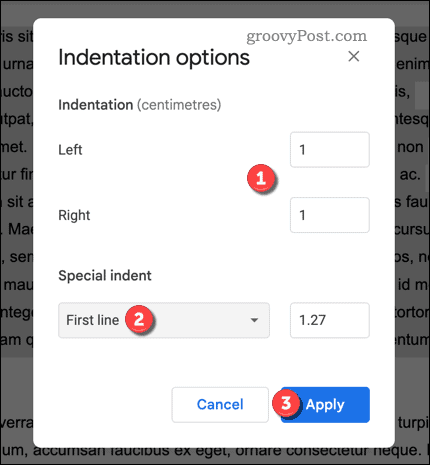
- Go to Format > Align and Indent > Indentation Options.

- On the Indentation Options dialog, change the default text indentation for both left and right.
- Using the Special indent section, you can also set default indentation rules (for example, for the first line of every page).
- Click Apply to save the changes.


Test out your changes to the text indentation settings in your document at this point. If you’re unhappy, repeat the process and reset the changes to restore your previous settings.
These settings only apply to your current document. If you want to change indentation settings for other documents, you’ll need to open those documents first and repeat these steps.
Cleaning Up in Google Docs
We’ve shown you how to fix indentation in Google Docs above in just a few easy steps. Want to make the most of your Google Docs experience? One way to do so is by inserting a video, which can help bring your documents to life.
Google Docs has amazing capabilities. For instance, displaying the word count lets you keep track of progress on long pieces of work.
Suppose you’re looking at optimizing your use of Google Docs. In that case, you can try using the document outline to organize and structure content—this’ll make it easier for readers or editors reviewing your text.