How to Clear Recents Folder on Mac
The Recents folder on your Mac can be useful, but you might want to clear it out from time to time. Learn how to clear your Recents folder on Mac here.
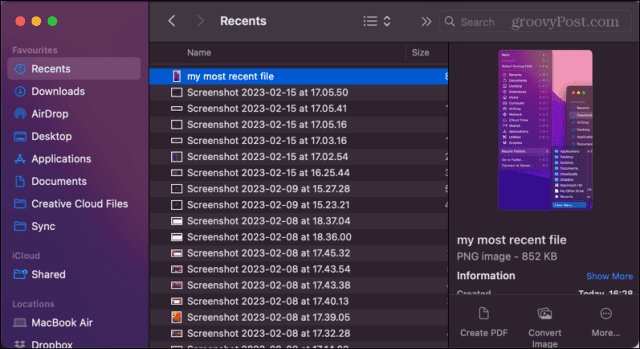
The Recents folder on your Mac is a quick and easy way to find the files you’ve been working on most recently. There’s no need to track down the actual location of the file; you can open it directly from the Recents folder.
Sometimes, however, you may not want your most recently used files to be visible in Finder, however. If someone else is using your computer, for example, then you might prefer this folder to be empty.
If you don’t want people to see the files you’ve been using most recently, then here’s how to clear your Recents folder on Mac
How Not to Clear Your Recents Folder on Mac
Before we take a look at how to clear your Recents folder, it’s important to explain the things that you shouldn’t do, as they could lead you to delete files that you actually want to keep.
Put simply: do not delete the files in your recents folder under any circumstances unless you want to remove them from your Mac completely.
That’s because the Recents folder on your Mac isn’t a typical folder at all—it’s a search folder. It’s not somewhere where files are permanently stored until they are moved or deleted. It’s actually a smart folder, where files from other locations on your computer are gathered into a virtual location.
In essence, the folder is just the results of a search for the files that you have accessed most recently.
If you try to clear your Recents folder by just selecting all the files and dropping them in the trash, then you won’t actually be clearing the files from your Recents folder at all. Instead, you’ll be clearing them from your entire computer.
They will be deleted from whatever location they’re actually saved in. If you empty your trash, you may not be able to recover them.
How to Clear Your Recents Folder on Mac
If you can’t just delete the files in your Recents folder, then how do you get rid of them? There are ways to do so, but they’re not the simplest of methods.
Place Files in an Excluded Folder
Since the Recents folder searches your indexed files to find those that have been accessed most recently, the only way to clear the folder is to remove the files from the index. These indexed files are part of Spotlight search, so you need to create a folder that is excluded from Spotlight search.
Any files that you drop in this folder will no longer appear in the index, and so won’t pop up in your Recents folder.
To create an excluded folder in Spotlight:
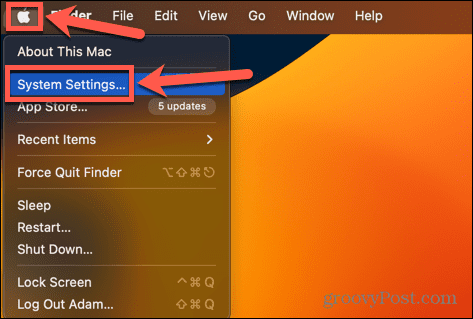
- Click the Apple icon and select System Settings.

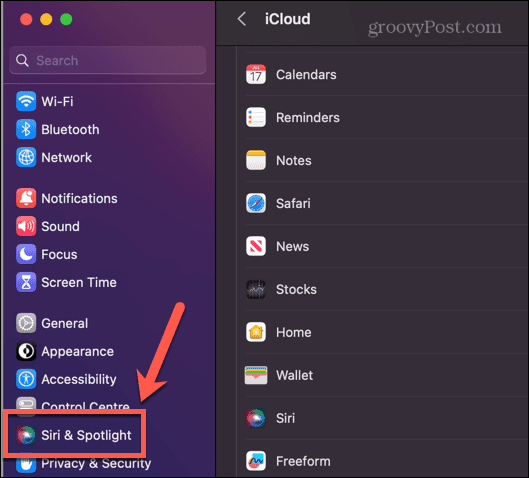
- In the left-hand menu, select Siri & Spotlight.

- Scroll down to the bottom of the screen and click Spotlight Privacy.

- Click the Plus (+) icon.

- Select the folder you want to exclude and click Choose.
- Click Done.

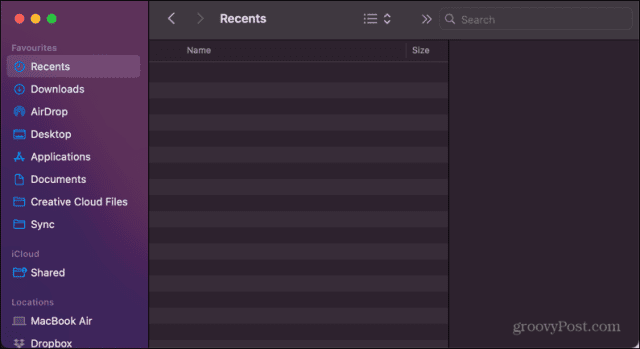
- Open Finder and move any files you want to remove from the Recents folder into the folder that you have just excluded from Spotlight.
- If you move all of the files in your Recents folder into your excluded folder, the Recents folder will be empty. You can open and close the files in your excluded folder as much as you like, and they won’t appear in your Recents.

- However, as soon as you interact with any file that isn’t in your excluded folder, the Recents folder will start to fill up again.


Exclude Your Entire Hard Drive
If continually having to move files to your excluded folder to keep your Recents folder empty just seems like too much work, you can opt to set your entire hard drive as an excluded folder. This means that any file you open from your hard drive won’t appear in your Recents folder.
This is a pretty nuclear option, however. It means that you also won’t be able to use Spotlight to search for any file on your hard drive, so you should only do it if you can live with that.
To exclude your entire hard drive from Spotlight:
- Click the Apple icon in the menu bar and select System Settings.
- Select Siri & Spotlight.
- At the bottom of the screen, click Spotlight Privacy.
- Click the Plus (+) icon.
- In the drop-down at the top of the Finder window, select your hard drive.

- Click Choose.
- You’ll see a warning message that you will prevent Spotlight from searching in your hard drive. If you’re sure you want to proceed, click OK.

- No files that you open from your hard drive will appear in your Recents folder.


Turn the Files into Hidden Files
Spotlight also doesn’t include hidden files in search results, so another way to stop files appearing in your Recents folder is to turn them into hidden files. It’s possible to hide files or folders using the chflags hidden command in Terminal, but this won’t remove them from your Recents folder.
Instead, you’ll need to add a period to the start of the file name. Finder won’t let you simply change the file name to include a period, so you’ll need to use the Terminal.
To hide files in Terminal:
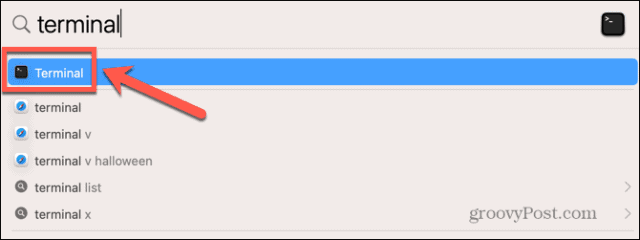
- Click Cmd+Space to open Spotlight and type Terminal into the search field.
- Open the Terminal app that appears in the results.

- Navigate to the folder containing the file or files you want to hide. For example, to navigate to Desktop/Excluded Files enter the following command in Terminal:
cd Desktop/Excluded\ Files
You’ll need to use a backslash before any spaces in your folder names.
- Once you’re in the appropriate folder, use the following command to add a period to the name of the file that you want to hide:
mv my\ most\ recent\ file.png .my\ most\ recent\ file.png
Once again, use a backslash before any spaces in your file name.
- Your file will now be renamed with a period in front of it, which causes it to become hidden.
- If you open the Recents folder, you will find that the file you have hidden is no longer showing.

- Repeat for any other files you want to hide.
- To unhide your files again, repeat steps 1-3 again, but switch the order of the file names so that the file name that starts with a period is first:
mv .my\ most\ recent\ file.png my\ most\ recent\ file.png

How to Remove the Recents Folder from Finder
All of the methods above allow you to remove files from your Recents folder, but they also stop you from using Spotlight to quickly find and open those files. Another option is to remove the Recents folder from Finder.
This doesn’t clear the folder, but it does stop it from showing up in Finder unless you specifically search for it.
To remove the Recents folder from Finder:
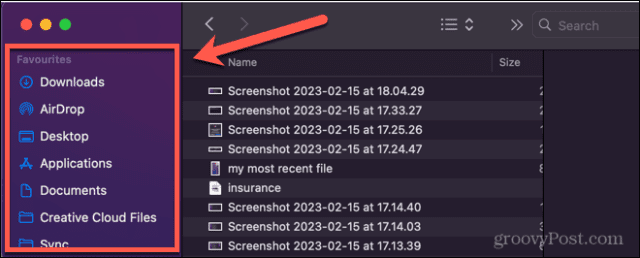
- Open Finder.
- Right-click on the Recents folder.
- Select Remove From Sidebar.

- The Recents folder is now missing from the Finder sidebar.


To add the Recents folder back into Finder:
- Open Finder.
- Click Finder in the menu bar and select Settings.

- Click the Sidebar icon.

- Check Recents.

- The Recents folder will now appear in the sidebar once more.


Using Finder on Your Mac
Learning how to clear your Recents folder on Mac ensures that Finder behaves exactly how you want it to and keeps your recent activity safe from prying eyes.
There are plenty of other ways you can tweak Finder to make it work exactly as you want it to. You can set the default folder then opens when you launch Finder. You can get Finder to show all of your hidden files. It’s even possible to tweak the color of your folders in Finder (well, a tiny bit!)